Skip to content

MOSS

Awesomizing your SharePoint picture libraries in no time

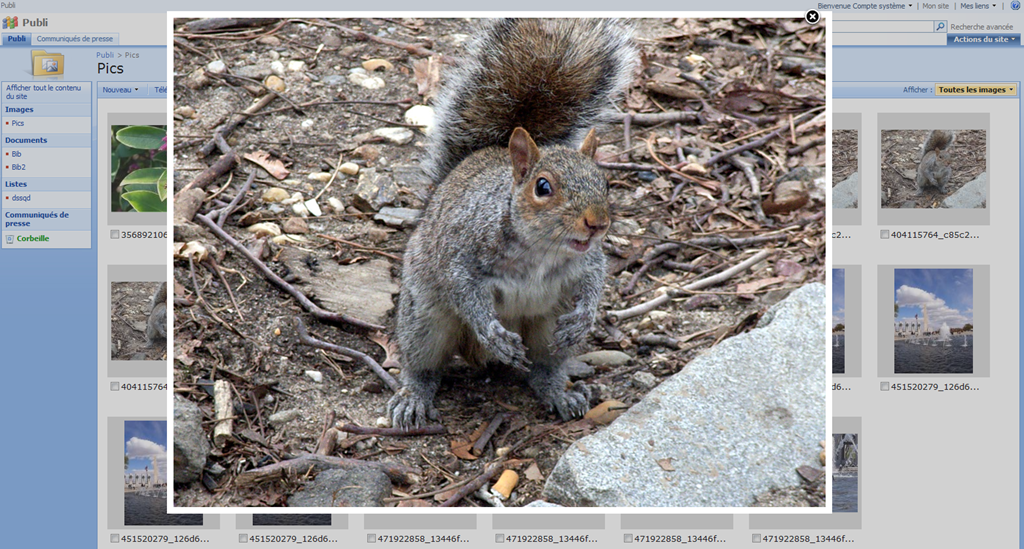
Still using those plain olds SharePoint picture libraries? You know the libraries where a click on a thumbnail brings ups the DispaForm.aspx pages with details about the pics that none of your users care about. What about having your picture in your libraries shown this way instead : A much better look, don't you think? Guess what, it’s as easy as ABC to enhance the way your picture libraries look like with very nice inpage popup.
The basics

To do that you need:

  • jQuery, a javascript library to ease development
  • FancyBox, a jQuery plugin to handle picture zoom/magnification automatically
  • A Content Editor Web Part, I use this editor web part to push my JavaScript code that will
  • Change the thumbnail so that they link to the full size picture instead of the Picture detail
  • Tell fancybox to do its magic so that these regular links launches a zoom on the full size picture
A detailed walkthrough
  • Get jQuery from (http://jquery.com/ )
  • Get FancyBox from: (http://fancybox.net/ )
  • Extract the fancybox folder from the zip you got
  • Put the jQuery file and fancybox in someplace your user can access. For the sake of simplicity I am going to put these files in a document library for this walkthrough. In a real world scenario I am putting these files in the 12 using a WSP.
  • Create or open an existing document library
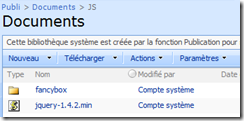
  • Create a JS folder (or not, I just like my stuff to be organized)
  • Push the jquery-1.4.2.min.js and fancybox folder in.
image

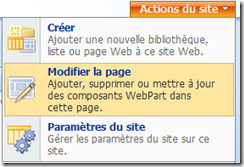
  • Now you can go to your Picture Library and Edit the page (screen grabbed from a French WSS Install)
clip_image001

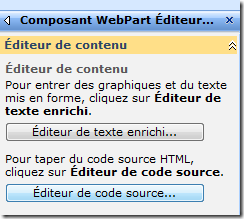
  • Add a Content Editor Web Part and edit it
  • Open the “Source Editor”

clip_image002 Paste the following code

<script type="text/javascript" src="/Documents/JS/jquery-1.4.2.min.js"></script>
<script type="text/javascript" src="/Documents/JS/fancybox/jquery.fancybox-1.3.1.pack.js"></script>
<link rel="stylesheet" href="/Documents/JS/fancybox/jquery.fancybox-1.3.1.css" type="text/css" media="screen" />
<script type="text/javascript">
// Jonathan Roussel
$(document).ready(function() {
//for each IMG node children of a A node in a .thumbnail class section
$(".thumbnail a > IMG").each(function(){
if($(this).attr('alt') == 'Image')
{
// Replace thumbnail link from item page to the pic itself
var imageUrl = $(this).attr('src');
// Change http://moss/pics/_t/MyPics_jpg.jpg
// In - http://moss/pics/MyPics.jpg
// using a regular expression
imageUrl = imageUrl.replace(/((.)+)\/_t\/((.)+)_([a-z]{3})\.[a-z]{3}/gi,'$1/$3.$5');
$(this).parent().attr('href',imageUrl );
$(this).parent().attr('rel','Gallerie' );
$(this).attr('alt','');
//plugin fancybox
$(this).parent().fancybox({'cyclic':true});
}
});
});
</script>
  • Press Ok and enjoy the magic of Fancybox.

The result might not yet be perfect; the two following notes shall set everything straight.

Notes 1,of missing GUI pics

The path to the pictures in the CSS might need to be modified for the pictures used by fancybox to work . So if you don’t see any Loading, Close, Prev, Next button, open the CSS in the document library (/documents/js/fancybox/jquery.fancybox-1.3.1.css) And replace (src='/fancybox with (src='/documents/js/fancybox Reload the Image Library in Internet Explorer and the pics shall be there.

Note 2, of using this with IE8:
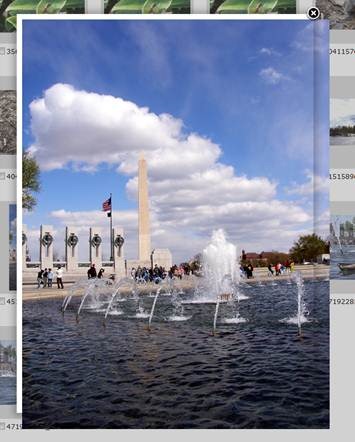
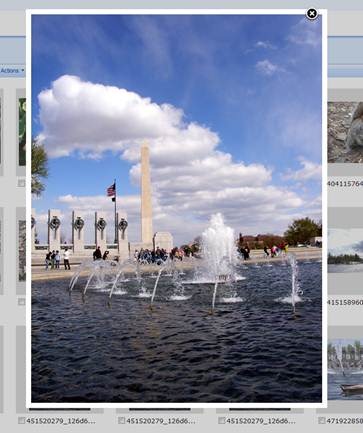
Fancybox, SharePoint and IE8. Needs some fixing This component seems to have trouble with IE8 and SharePoint. Without a strict XHTML doctype the picture frame are messed up as you can see on the right: Fancybox, SharePoint and IE8. A match fixed ! As adding an XHTML strict doctype was a no go, I tried to circumvent the problem by removing the frame and setting the white frame right. Here is the result: Not as nice as what fancybox can do (lost the gradient border) but good enough for my purpose. To get this result you will need to do these modifications in the css file (the same on you modified in note 1):
Original & Instructions Target
#fancybox-outer replace line
background: #FFF;
top:-10px !important;
left:-10px !important;
/*background: #FFF; */
#fancybox-inner replace line
top: 0;
left: 0;
top: 0 !important;
left: 0 !important;
.fancy-bg add line display: none !important;
Add at the end of the file .fancybox-ie {
background-color:#fff;
}
After saving the CSS and reloading the page you should be all set and ready to receive your end user congratulations :)
>
Of course, this is only a start. The next step would be to have the picture retrieved by a Content Query Web Part with the fancybox magic added. It would mean losing the option to download multiple picture and it would allow for an even better rendering.

Consuming Search Web Service in SharePoint Designer - the encoding problem

The other day I was using the DataFormWebPart (DataViewWebPart) to consume the MOSS Search web service. As I had some advanced parameterization to do, the SharePoint Designer GUI wasn't enough, so I had to modify the encoded QueryXml. You know those stuff looking like :

_x0020_Rank_x002c__x0020_Size_x002c__x0020_Description_x002c__x0020_

As you can see it's a real pleasure to edit such encoded text. So I decided to roll up my sleeves and made a Quick 'nDirty HTML page with some javascript to encode/decode such encoding. Here is the page : jonathanroussel.com/unicodec

SharePoint Walktrough - Displaying List Items with their attachments Part 1/2

image The SharePoint Out Of the Box List View Web Part is quite powerful, yet it isn’t able to display the attachments of a List Item. It can show if an item has any attachments (with a nice paper-clip icon) but you won’t be able to download these attachments directly. As with most SharePoint limitation, there is a workaround. Drasko Popovic wrote about a JavaScript based workaround on CodeProject you might want to check out at http://www.codeproject.com/KB/sharepoint/DataViewAttachments.aspx. In this post I want to presents you another workaround where all processing are done server-side with a single Web Service call (Lists.asmx). You will need SharePoint Designer 2007 (freely downloadable since the 2nd April 2009 at http://www.microsoft.com/downloads/details.aspx?FamilyID=baa3ad86-bfc1-4bd4-9812-d9e710d44f42&displaylang=en ) and of course a MOSS or WSS instance. As this walkthrough is pretty long for a blog post, it is split into two parts. If you already how to create a Data View web part to display the elements of a list through calls to the Lists.asmx web service, I would suggest you to move to part 2 of this walkthrough.

0 – Principle/Rationale

We have a list in a SharePoint site and want to display the titles of this list’s elements along with direct links to their attachments. We are going to create a Data View Web Part using SharePoint Designer, this Data View will consume the SharePoint Web Service to get the items of a list along with their attachments. The data view will display these items using a XSL we will define. As a bonus this method will allows us to display the list items on a different SharePoint site or collection than the list itself.

1 – Create or Open a page

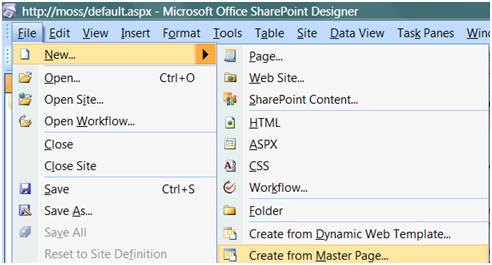
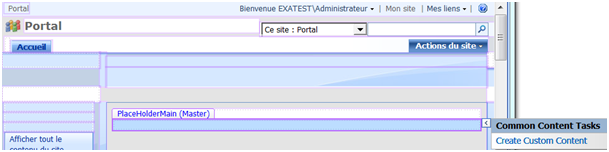
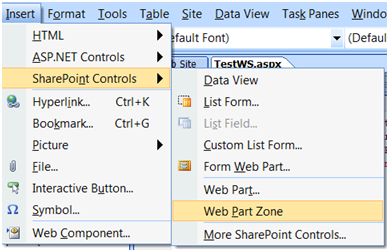
In SharePoint Designer after opening your site, either open an existing page or create a new one. I choose this last option: image Make some room for our content in the PlaceHolderMain zone of the page by creating a custom content. image Adding a Web Part zone isn’t mandatory but I strongly recommend it at this point. Click in the new Custom Content Zone you created in the design view, then click Insert|SharePoint Controls| Web Part Zone. image You should get something looking like that in the Design View: image SharePoint Designer is sometimes quite buggy, saving frequently from this point on might be a good idea. You can save the page wherever you want to. If you are creating multiple custom pages, creating a dedicated Document Library to hold these pages is a good idea; such a library already exists if you have activated the publication feature.

2 – Create a Web Service Data Source

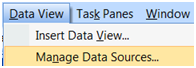
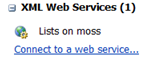
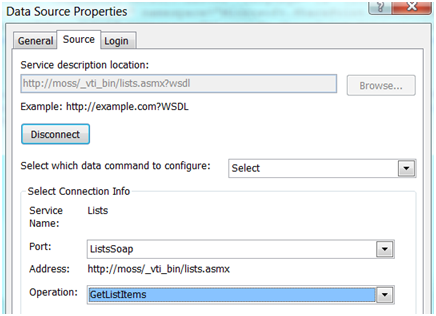
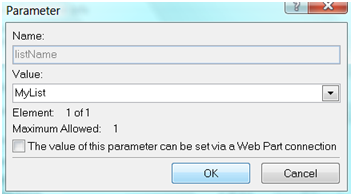
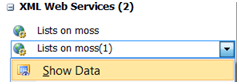
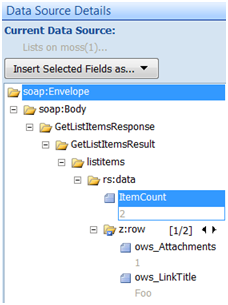
imageThe page is now ready to host our Data View web part. Open the Data Source view by clicking Data View| Manage Data Sources. imageChoose to connect to a web service: In the Service Description Location enter: http://SP_SITE_URL/_vti_bin/lists.asmx, then click connect and choose the GetListItems operation: image imageDouble click on the listName parameter and enter the name or guid (between brackets {}) of your list. imageValidate the Data Source Properties and check that it is working correctly by trying to see the data returned by this data source: If a new panel opens with the list data, it means it’s working. image

Troubleshooting:

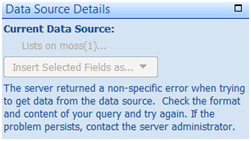
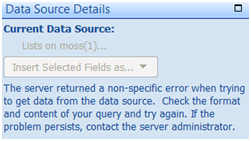
If it isn’t working you will be presented with an enigmatic error message giving you absolutely no details: image This can be caused by numerous reasons you want to check:

  • The name or guid of the list is invalid
  • You tried to specify other parameters of the Web Service such as QueryOptions or ViewFields. These parameters can’t be specified at this point as the SharePoint Designer Team Blog attests it (http://blogs.msdn.com/sharepointdesigner/archive/2008/06/20/data-source-issues-and-workarounds.aspx). We will modify those latter on.
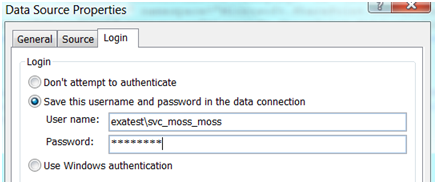
  • Problem of authentication, I need to investigate this problem but it seems like you sometimes can’t use the integrated authentication even when using a single WFE. In this case you have to change the Web Service Authentication method to basic and to specify a domain account that has the appropriate permission to read the list items and contact the web service.
Changing the Web Service authentication:

Open the Data Source properties image Open the login tab and choose basic authentication: image Save the details and try again to retrieve the data.

3 – Create the Data View Web Part

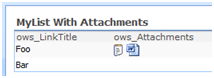
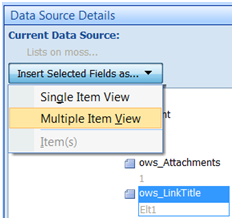
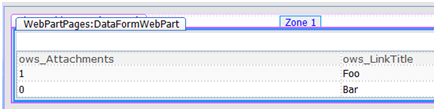
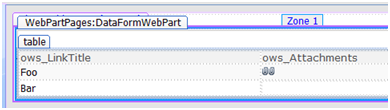
We now have a working Data Source, let’s create a web part to display it. In the Data Source Details, select the ows_LinkTitle and ows_Attachments properties and choose insert this field as a Multiple Item View (Note: you might need to select the Web Part zone in the design view of the page beforehand). image You shall now see something like that in the design view. image We know have a very basic Data View Web Part but as you may have noticed the ows_attachments fields just display the number of attachments but not the actual links to these attachments. We will see in part 2 of this walkthrough how to solve this.

SharePoint Walktrough - Displaying List Items with their attachments Part 2/2

image Recap The SharePoint Out Of the Box List View Web Part is quite powerful, yet it isn’t able to display the attachments of a List Item. It can show if an item has any attachments (with a nice paper-clip icon) but you won’t be able to download these attachments directly. I presented in Part 1 of this walkthroughhow to create a DataView part consuming the Lists.asmx Web Service in SharePoint Designer to display the elements of a list. We are now going to display the attachments of these list elements. To retrieve the attachments URLs we need to add an option to the Web Service Soap query, the “IncludeAttachmentUrls” option (details of the query options is available at http://msdn.microsoft.com/en-us/library/microsoft.sharepoint.spquery_properties.aspx). We could just open the datasource and change the QueryOptions parameter, that is if the SharePoint WSDL files were correctly defined… As it is not the case and SharePoint Designer itself isn’t perfect, you won’t be able to do that (see http://blogs.msdn.com/sharepointdesigner/archive/2008/06/20/data-source-issues-and-workarounds.aspx for reference). But there is a workaround!

4 – Modify the DataSource QueryOptions parameters

imageFirst you need to have access to the page source, so let’s switch SharePoint Designer to Split or Code view : In the code, search for the line starting with: “SharePoint:SoapDataSource”. On the same line you shall see something like “ </listName></GetListItems></soap:Body>”. image As you can see the parameters we defined in the Data Source Gui are found here and guess what, we can modify these parameters from here! So let’s add the parameter requesting the attachments url :

<queryOptions><QueryOptions><IncludeAttachmentUrls>TRUE</IncludeAttachmentUrls></QueryOptions></queryOptions>

So that the end of the soap request body looks like :

</listName><queryOptions><QueryOptions><IncludeAttachmentUrls>TRUE</IncludeAttachmentUrls></QueryOptions></queryOptions></GetListItems></soap:Body>

Save the page and check the result in the design view : image The ows_attachments field now contains the attachments URLs or 0 for list items with no attachments using the following format :

;#http://moss/Lists/MyList/Attachments/1/Piece.txt;#http://moss/Lists/MyList/Attachments/1/Piece2.txt;#

We still need to make some nice links out of this field. Time to put on your XSL designer gear.

5 – Modify the XSL Presentation

We first create a XSL template to transform the string given by the Web Service into a nice series of picture. You might use my sample below, paste this piece of code in the XSL part of the aspx page you are editing in SharePoint Designer (maybe just before the node “</xsl:stylesheet>”).

<xsl:template name="SplitAttachments">     
  <xsl:param name="str"/> 
  <xsl:choose>      
    <xsl:when test="contains($str,';#')">      
      <xsl:variable name="attachmentUrl" select="substring-before($str,';#')"/>      
      <xsl:if test="string-length($attachmentUrl) != 0">      
        <a href="{$attachmentUrl}"><img style="border:0px" src="/_layouts/images/attach.gif" alt='Open'/></a>      
    </xsl:if>      
    <xsl:call-template name="SplitAttachments">      
      <xsl:with-param name="str" select="substring-after($str,';#')" />      
    </xsl:call-template>      
    </xsl:when>      
  <xsl:otherwise>      
  </xsl:otherwise>      
  </xsl:choose>      
</xsl:template>

This XSL template uses a recursive template to parse the attachments and generate corresponding links and pictures. Now replace

<xsl:value-of select="@ows_Attachments"/>

By

<xsl:call-template name="SplitAttachments">    
<xsl:with-param name="str" select="@ows_Attachments" />     
</xsl:call-template>

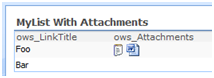
And you should see this : image The paper clip icon you see are actually pointing to the attachments.

6 – Pimp up my Data View

At this point our Data View Web Part works ok but isn't as nice as you might want it to be. As an example you might want to change these paper clips icons with icons representing the file type. The good news is that the XSL extension provided by WSS (default prefix used by SharePoint Designer is DDWRT) can handle this through a MapToIcon template. If you give a file extension to this template, it will return the icon filename corresponding to this filetype. Using the substring-after method to get the filetype we can imagine replacing :

/_layouts/images/attach.gif

By

/_layouts/images/{ddwrt:MapToIcon('',substring-after($attachmentUrl,'.'))}

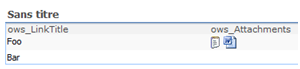
imageNow save the file and check the result : It still isn't perfect but from this point on things will be much easier to improve if you know your HTML and a bit of XSL.

7 – Conclusion

That’s it, you have got a functional Web Part to display your List. Using this method you can specify every parameters of the GetListItems method, as an example the ViewName parameter can prove usefull to filter items. If you need to test your parameter I would suggest you to try soapui.org. You can of course export this web part to put it another page, even on another page of another SharePoint farm (in this case, you will have to use the basic authentication mode unless kerberos authentication can do the trick). If you want to display another list you can just export the WebPart and edit the file before reimporting it. This might prove very useful to put this web part on a publication page as these pages can’t be edited using SharePoint Designer. If you need more details you can contact me by leaving a comment or using the "IM Me" box on the right of this page.

Quick, Easy and Free WAN emulation with WANem

Fibre Channel cable By Herrolm @ Flickr A client recently asked us to deploy a MOSS based intranet over multiple geographical sites. The gist of it is to have a SharePoint farm in France and a second one in the US, with this dual-farms setup being as transparent as possible to the user. This in itself represents quite a challenge and as such will be the subject of a post once the project is finished. We, of course, tried our different options in a mock up environment consisting of several virtual machines hosted on a single VMVare server instance. As such, this set-up obviously lacked in representativeness of the actual environment. Being geographically dispersed the servers are not able to communicate in real life as efficiently as they can in the mock-up environment. They are indeed connected over WAN with round trip latencies over 100 milliseconds. We fiddled a bit with VMWare server options trying to find an option to limit the virtual network speeds, without any success. It would seems like VMWare ESX is better suited for this kind of WAN emulation but ESX wasn’t an option, especially considering that we had no certitude about its features regarding WAN emulation.

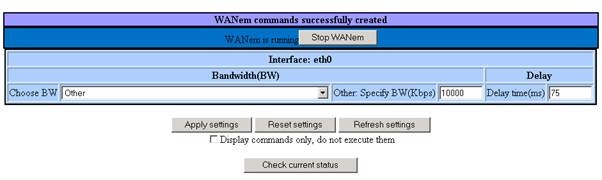
But wait, there is a free, open-source, easy –to-install, easy-to-use option available. Let me introduce you to WANem (for Wide Area Network Emulator). It’s a Linux live-cd (The numerous 2.09 % of linux visitors over the past month on this blog might be interested to know that it is based on Knoppix) bundled with the WANEm software itself that Tata Consulting provides us with at http://wanem.sourceforge.net.

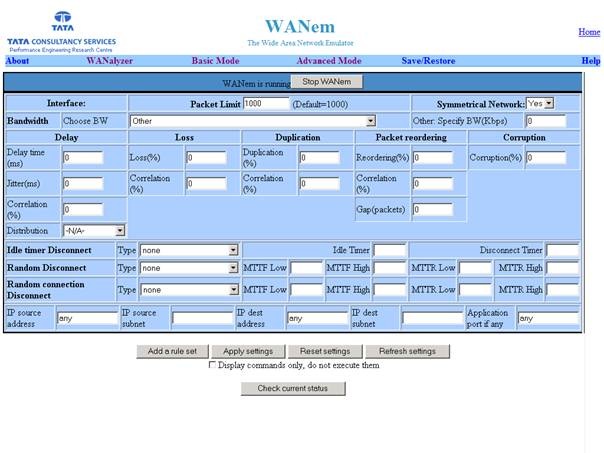
As it is a live-cd, there is absolutely no installation to be done. Just boot up, select DHCP or enter the network information and you are good to go. You can then select from a direct-to-the-point interface what bandwith limitations and latencies you want to enforce. An advanced mode will even allow you to specify numerous others parameters such as the packet loss ratio. The only other piece of configuration you’ll need to do is to specify routes on your servers so that the packets actually go through the WANEm machine. WANEm Web Console in Advanced Mode So, we have a very easy-to-use, functional software for free! Seems great! Too good to be true, wait, it’s not all; the documentation included is a delight. I don’t know if it’s the same for you, but I have spent hours trying to make some open-source software work because of poor or inexistent documentation. Don’t get me wrong, open-source is great but sometimes the greatness of the piece of the software itself is at the cost of the documentation. The WANEM Web console in basic mode Anyway, they probably tought it wasn’t enough so they put a nice cherry at the top of the cake and created a VMWare server appliance with WANEm configured. Finally because everything ought to have a default, WANEm is only available as a live-cd, even when provided in a virtual machine. Therefore the configuration isn’t persisted and you will have to reenter it every time you reboot the computer/vm, no big deal considering the few steps involved. It might even change soon as I read on their forum that a guy might have actually installed it on a drive (virtual or physical). So if you need to emulate a WAN and don’t want/need to invest in an expensive Hardware solution, I strongly recommend you to give WANem a try at http://wanem.sourceforge.net. Fiber Channel photo courtesy of Herrolm @ Flickr

Sorting / Filtering SharePoint RSS feeds

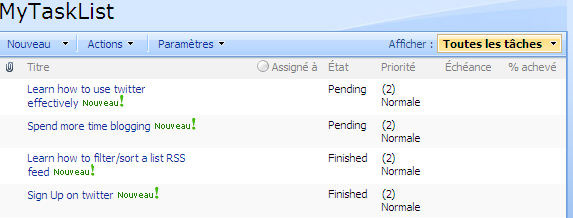
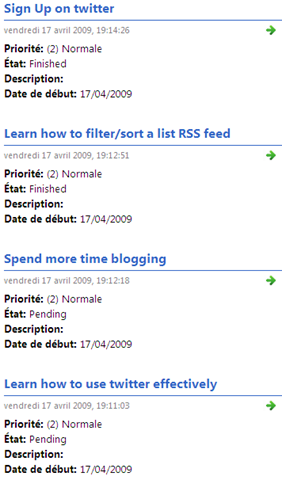
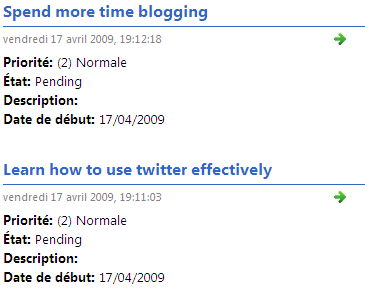
Really, REALLY BIG RSS feed button by photopia / HiMY SYeD on flickr.com Ever wondered if it was possible to sort or filter the automatically generated SharePoint RSS feeds? Well I did and, as a matter of fact, I found a solution. The idea is very simple, you create the view that will filter or sort your list elements according to your needs. You then take the guid of your view and append it to the feed URL. Et Voila ! Here is an example, let’s say I have a Task List (screenshot from a French MOSS farm, I am sure you’ll get the idea anyway) with some items pending, other finished. This status is defined in a “State” (Etat) column. image I first create two views filtering on the Etat column. One returns the pending elements, the other returns the finished elements. I then take note of the guid of my two views (Editing the views and extracting the &View=….. part of the URL does the trick). After making sure that RSS feeding is activated for my task list, I can go check the RSS feed at : http://MyServer/_layouts/listfeed.aspx?List=a4a88bd0%2Ddf29%2D4f54%2Da924%2D195be47346ed The results as displayed by IE7 looks like : image All the items are displayed whatever their status but let’s say that I want to see only the elements pending, so that I know what I need to work on. I just append "&View=<VIEW_GUID>" to the URL and here is the result : http://MyServer/_layouts/listfeed.aspx?List=a4a88bd0%2Ddf29%2D4f54%2Da924%2D195be47346ed&View=%7B9F3ACEAB%2D75DF%2D4C04%2D83C2%2D3A5733A6CA31%7D image By the way, I only tested this on a MOSS 2007 SP1 install. I would be interested to know if it works with WSS as well. I wonder if this is documented anywhere as I stumbled upon this feature by pure chance ? RSS picture credit Photopia on flickr

Thinking of copying a locked SharePoint site collection ? Think twice !

clip_image002[7]I recently had to copy a locked SharePoint site collection from one farm to another farm. I soon realized this wasn’t such a great idea especially if the farms aren’t in the same AD domain. Here is a quick recap of what I noticed after a few more investigatory steps. Eager readers will eagerly jump to the final conclusion.


Copying though stsadm backup/restore

Let’s try copying this site collection with the stsadm backup and restore commands. Both farms are MOSS RTM farms. The backup worked smoothly. The restore is a total disaster (“Additions to this Web site have been blocked. Please contact the administrator to resolve this problem.”) : screenshot.1 The weirder part is that the collection is visible in the central administration but it seems totally messed up. No way to delete it from the Central Adminsitration. The stsadm deletesite command returns the “Additions to this Web site have been blocked. Please contact the administrator to resolve this problem.” error. Conclusion : Not a good idea ! Might actually works using the trick I finally used, see below.

Copying using a SQL Server backup

Seemed like today would be another day battling with SharePoint. But I wasn't short on idea. Indeed My locked site collection was alone in its content DB, therefore I was able to use a backup to restore the collection on my target farm. The restore wentsmoothly. I was starting to believe it was actually going to be easy! And then my frail hopes were cruelly shattered by the terrible SharePoint truth when I opened up the Central Administration to change the collection administrator. The first obvious step is to select the site collection but when selecting the site collection in the “Select Site Collection” popup, none of the collection details would appear on the right. clip_image004 Huh ? I tried validating the popup anyway and was presented with this screen: clip_image006 It seemed just as if I had selected nothing, yet the adress bar contained the id of the content database : clip_image008 Trying to unlock this site collection would produce kind of the same result. I then realized that the farm administrator had no right on the collection. He indeed had no permissions on the collection when it was backuped. Lucky me, the farms were part of the same domain, therefore I tried a quick and dirty fix, I added the original farm administrator to the target farm administrator group and logged in the Central Adminsitration with this administrator. It was a relief to be able to see the details of the collection. Thou shan’t prevail over me SharePoint ! But once again, I underestimated my adversary which quickly retaliated with a now too common “Additions to this Web site have been blocked” when I tried changing the collection administrator. clip_image010 But victory was mine at long last when I unlocked the collection while logged in with the original farm administrator account on the target farm. After this step I was able to change the collection administrator to the target farm administrator as I intended from the beginning. Conclusion : It works, but both farms have to be in the same AD domain

Final Conclusion

If possible I would advise you to unlock the site collection before proceeding with the copy. If it isn’t possible, I hope both of your farms are part of the same AD domain, otherwise good luck! Please keep me posted if the powers that be are you on your side. By the way, for those of you thinking that I should have tried the stsadm export command, one simply can’t export a locked site collection this way.

SharePoint : Search using « This Site » or “This List” scope returning no results

I met a problem with the Search scope on a MOSS 2007 farm the other day that I thought was worth blogging about. On all the content sites of our farm, the “All Sites” scope worked as expected, but the “This Site” or “This List” search scopes wouldn’t return a single result. There are several reasons that can explains this problem according to this technet forum thread (http://social.technet.microsoft.com/Forums/en-US/sharepointsearch/thread/906045d8-8782-4c39-be1b-7632f7239019/#page:1), in our case the problem was due to a difference between the Content Source defined for the crawl and the default zone defined in the Alternate Access mapping. Our Alternate Access Mapping for this zone was defined as follow:

Private URL Zone Public URL
http://hostname Default http://hostname
http://intra.dnsname.com Intranet http://intra.dnsname.com
And we used http://intra.dnsname.com as the start address for the crawl.
We tried changing the content source start address from http://intra.dnsname.com to http://hostname, resetted the crawl content and launched a full crawl and that was it. The “This Site” and list scopes worked perfectly from then on.
That could have been it, except that this change caused another problem. Before this modification we had no trouble with links URL, I mean if I used http://intra.dnsname.com to reach the site, all the links in the pages would use this dns name, not the hostname. After the modification of the content source however, some search results would sometimes be presented with the hostname in the url instead of the dns name.
To solve that problem we changed the Alternate Acces Mapping configuration to:
Private URL Zone Public URL
http://hostname Default http://intra.dnsname.com
http://intra.dnsname.com Default http://intra.dnsname.com
Voila! The Site and List scopes are working and the URL are always based on the DNS name when someone uses the DNS name to reach to site.
By the way, you might find this article about Alternate Access Mapping very useful: http://blogs.msdn.com/sharepoint/archive/2007/03/06/what-every-sharepoint-administrator-needs-to-know-about-alternate-access-mappings-part-1.aspx

Infinite looping the MOSS OOTB approval workflow

A few days ago, I noticed something weird with the Microsoft Office SharePoint Server out of the box workflow, most specifically with the workflow option to start when an item is modified. I was trying to set up the Approval Workflow on a SharePoint List with content approval activated. I first set up the workflow to ask for approval when a new item is submitted to the list. It worked fine but we also needed to ask for approval when an item was updated (e.g. the writer made a mistake and notice it after the approver did his job, thus he modify the item that as a result needs to be approved a second time). I fired up the workflow configuration page and checked the infamous “Start Workflow when an item is modified” in the start options. From a french MOSS install And from then everything went wrong. Whenever an approvers did his job by approving an item, the workflow would be launched again and a new approval task would be added to the workflow task list. I tried tweaking the workflow, modifying the tasks list used … but nothing would do the trick, the workflow was stuck in an infinite loop whenever the “Start on item edit” was activated.

And that’s when it hit me, changing the approval status of an item seemed to be considered as a modification of the item itself.
I am still surprised by what I can’t help but see as a major flaw of SharePoint. I definitely don’t think that the approval status of an item is part of the item itself, it is only a SharePoint information about OUR piece of information (the item).

I also was surprised by how few people seems to react to this fact based on a few google search I made. Yet it seems other people faced the same problem (http://social.msdn.microsoft.com/Forums/en-US/sharepointworkflow/thread/62f5921d-9d02-4924-a61f-97ad169d1043/ and http://unitedsupplyco.sharepointsite.net/publicfacing/bensblog/Lists/Posts/Post.aspx?ID=34 ). If you have any information about this subject, I would enjoy to know it.

Sharepoint - Sorting people search results by name

Hello Dear Reader, for this new post. First some personal news, after working for quite sometime on load testing a java CRM application, I wanted to move on and finally work with the newest Microsoft technologies. And that’s what I did as I managed to land a job at a local Microsoft Gold Partner in Nantes, France. The team I ‘m part of is mainly working integrating the Sharepoint solution for local partner, and I got to say it’s a nice opportunity so far.

Background

For my first Sharepoint post I’ll speak about the limitation of the integrated People Search functionality. With MOSS 2007 comes the Enterprise Search Center that allows you to gives an easy acces to the search engine to your users. This Sharepoint site (because that’s exactly what it is) comewith two search mode OOB:

  • a standard search for searching through documents, lists, pages, ... basically whatever you let the Search Engine crawl and
  • a people search for, you guessed it, searching people based on any properties you want among the profile properties defined in the SSP (Shared Service Provider)

We recently had a problem where a client wanted to:

  • Display the list of employee for each office, sorted by name/firstname
  • Be able to search a client based on its name/firstname
The problem

We first imagined to fulfill these two needs with a single item, a people search page, where results per office would be obtained by adding the office as a searchable property. And that’s when we realized a huge shortcoming of the Search Center:

People search results can’t be sorted on arbitrary fields you will define, such as the name/firstname. Two standard Sorting modes are available and that’s it. Results can be sorted based on the ranking computed by the Search server. Results can also be sorted by social distance, the principle is fine enough, if you are looking for a John, it will first display the John who is your direct colleague instead of the John who is working in another department of another office.

The almost working workaround

Starting from this realization, we figured we might solve this problem by doing a quick sorting in the XSL displaying the results. This way, the sorting could be done on any fields necessary. While this solution is perfect if you have less than 50 results, it is not a full working solution. The thing is, the search engine first returns the results. These results are then divided (by the Search Core Results web part) in x collections of y elements (people) where y is a webpart parameter capped at 50. Therefore if we have more than 50 matchs, the sorting will be done separately on each page in a discontinued manner. That is , a hypothetical “Albert Alden” might be on page 2 while “Brittany Bern” is on page 1 if his rating is lower than Brittany’s. But we know for sure that “Cindy Costner” which is on page 2 will be presented after Albert whatever her rating is because the sorting on each page is done lexicographically by our XSL.

The working workaround

Keeping these limitations in mind we had to devise a quick solution. We chose to keep the standard people search for standard people search, considering the size of the company and the fact way it is going to be used. Yet we still needed a way to present the users with a list of all the employees of any given office (at this point, it’s probably needless to remind you that we REALLY want this list to be sorted by name/firstname J). That’s when we stumbled upon this superb article by Dietmar Kurok (http://www.codeproject.com/KB/sharepoint/DepartmentPeopleViewer1.aspx ). The solution is to use the Web Service exposed by the search engine to get the information we need sorted as we need and then present it with a XSL of our own. In our case we used the same principle as the one used in Dietmar Kuork’s article, however we chose to generate our QueryEx input parameter (the Querypacket) with a very nice tool available on CodePlex. The tool is named SharePoint Search Service Tool and will be found at http://www.codeplex.com/SharePointSearchServ. The general idea of the process is to: image I hope you enjoyed this first Sharepoint post and I hope to be able to post more often on this nice product in the future.